Monday, January 2, 2012

Half Bath Renovations

I remember the days where I used to be devastated to receive a gift card for Christmas. The suspense of a gift all wrapped up in it's paper cocoon was always more alluring than a piece of plastic.  My how the times have changed...

We (I) chose to use our $100 Lowe's gift card (plus some other funds) to renovate our downstairs half bathroom. Eight months after moving into our new home our pepto bismol meets floral fields bathroom finally needed to go.


Half Bath --Before
I'd like to recommend nobody ever again install a wallpaper border in their home. They are horrible. They never "keep up" with the times and when you decide to sell your home...trust me. Only the suckers thinking they are Martha Vila (like us) will buy your house! They will then hate that they ever convinced themselves that wallpaper was "no big deal" and spend countless months cursing your name! ::sigh::

Half Bath --Before


After 2.5 hours of scraping wallpaper off the bathroom walls, I did a little research on HGTV.  There I found suggestions for the proper way to prepare paneling you wish to paint. We found a sanding sponge (or so that's what I call it) worked wonders. I believe we used 60 grit and the varnish on the paneling came right off with fairly minimal effort. After sanding we wiped down the walls and then used Kilz to prime the surface. I know it costs more, but I just don't think you can go wrong!

Tip: after sanding and priming your paneling, you can fill your grooves with mud if you choose to have a flat surface. Don't mud BEFORE priming.

The other big project was to refurb the vanity. When we first bought our house I remember walking into this particular bathroom and thinking, "That awful thing will be the first to go!".  Eight months later I'm so happy I didn't use a sledge hammer that first week! It is amazing what Valspar spray paint in a deep chocolate brown and a few new brushed nickel fixtures can do! After deciding the vanity top was actually in great condition, I figured we had nothing to lose. I strongly recommend (thanks mom) to spray paint a vanity over using a paint brush.  This way you have a clean finish without brush strokes. By far this vanity has become my favorite transformation thus far in our house!

I also say (7 rooms later) not cheaping out on your paint is a must! Valspar Signature paints have not done us wrong yet. I do find after 7 rooms, if you prime first, there hasn't been a need to do a second coat! I chose a teal color to coordinate with the brown and then added a new medicine cabinet and got rid of that horrible mirror.

Point of today's blog...junk can turn into treasure and paint should be your best friend! I'll let the pictures further speak for themselves!

Half Bath --After


Sunday, December 11, 2011

DIY: "Melting" Ice Cream Cone Cake

Madison's 1st Birthday!


Never considered yourself good at baking? The first time you heard the term "dirty ice" you questioned why someone would ever want to use icing and dirt on a perfectly nice cake, didn't you? Hmm...maybe that was just me.


Original inspiration cake at One Charming Party


I will be the first to say I have NO idea what I'm doing when it comes to cake decorating. But, when I saw this cake at One Charming Party's website, I thought I could tackle it. For a quick party you easily could throw a real ice cream cone on top like they suggest. BUT, if you are letting the cake sit out for show for some time, I have the perfect solution for this problem. Afterall, we want it to look like its melting...not actually BE melting everywhere!


My first bit of advice. Do a practice run. Your family will love you because even cake that doesn't look pretty tastes grrreat!

View of my 2nd and final version of the cake
Supplies:
  • Your favorite cake mix plus any ingredients as stated in directions
  • Your favorite icing in Vanilla (if you want to make it pink)
  • Rice Krispies cereal and ingredients to make RK treats! (Marshmallow, butter)
  • Red Food coloring
  • Cardboard cut to a 9" circle, or cake board
  • Duncan Hines Glaze (chocolate)
  • Sugar Cone
  • Sprinkles
    The first thing Maddy went for!
Prepping the cake:
  • Bake 2-8" cakes as directed
  • Let cool 10 mins before removing from pan. (for best removal Pam for baking is your new BFF)
  • Let fully cool on counter (away from your dogs, away from your husband)
  • Using a sharp (my finger knows) bread knife, trim off the dome of each cake so you have a nice flat surface.
Prepping the icing:
  • Spoon out your icing into a mixing bowl, add 2-3 drops of red food coloring. Remember, less is best! If you add to much it will be red not pink. So if your looking for a pastel pink 2 drops may be just enough for you! The first time I used an electric mixer to incorporate it, but found I should have then chilled my icing because it made it too whipped for spreading in my opinion. I actually liked the result better the second time when I hand folded it until fully incorporated. 
  • Chill covered in fridge while you move onto the rice krispy treats!
Prepping the "melted" ice cream scoop:
  • Lightly grease a plate with the flattest edge/lip you own! a cookie sheet without a lip would work well (You'll thank me!)
  • Make Rice Krispy treats just as you normally would. When you get to the part that you would normally spoon it out into a pan, do this:
    • With buttered hands grab a glob, make a ball with a smooshed ring around the side and a flat bottom. Think of a 3D rice krispy version of Saturn and you cut it in half! I suggest you make 3-5 of these and place on your plate. That way you can choose the best one later. Imagine what a scoop of ice cream might look like if it sat on a plate. You want the ball portion of the ball to be a diameter that will visually work well with your sugar cone.
  • Remember! These cool really quick, work fast. This is why I suggest making a few at once.
  • Place to cool on your greased plate.
  Icing the cake:
  • By now your icing should be cooled, give it a few gentle whips before icing your cake.
  • Put one of your cake layers, cut side down, onto your cardboard circle that you lined with tin foil.
  • Put a generous layer of icing on top and then place the second cake, cut side down into your icing. This means you made an icing sandwich and you should NOT see any cut sides of cakes looking at you.
  • Spoon several globs of icing on top of your cake and spread evenly over the entire cake.
  • At this point I sat the cake into the fridge to let the icing chill again.
  • Tip: use your turkey roasting pan if you don't have a cake carrier!
Time to Glaze!:
  • You could make a ganache and do this yourself. I became giddy in the supermarket when I found this Duncan Hines glaze. Pre-made = I can't mess it up!
  • Warm your glaze according to the instructions. Shake the bajesus out of it. And then shake it some more! For this to work your pour has to be completely a smooth drizzle!
  • Pull your krispy ice cream scoops out of the fridge, and begin a straight drizzle onto the top of the rice krispy treat. Don't over do it, but make sure it is fully covered. what drizzles onto the plate is GREAT! This is why you greased the plate for removal. Before it sets add a few sprinkles. You can add the sugar cone now, or wait. I thought it was tricky to get the scoop on the cake to do it now...but it did bond better doing it at this stage.
  • Place back in the fridge to cool and set!
  • Grab your cake back out of the fridge...same concept. Steady drizzle on top of the cake...allowing it to run over the sides...less can be more.
Finishing Touches:
  • Once your Ice cream scoops are set, pick the one you want to use!
  • Gently remove it from the plate with your thinnest flipper!
  • Place it in the center of the cake..a little new drizzle if the chocolate already set on the cake. This secures a bond...
  • If you didn't add the cone do so now. You may need a little chocolate around the rim of the cone like glue!
  • I chose not to add icing after the fact along the bottom and decided I liked the drip edge better!

Enjoy Your Masterpiece!!! I promise it's not as difficult as it may sound! Especially if I could it!

Closeup of the cake!
Maddy enjoying her cake at her first birthday!
Maddy putting her own spin on the look of the cake!

DIY: Sundae Station


To achieve this look isn't difficult...if you learn from my mistakes!
(Warning: If you have a rocky relationship, I don't suggest you build this with your significant other!....just saying...)

We chose this design because the location for Maddy's party was already going to have tables so it wasn't necessary to also construct a base. While it would have been cute it would have cost a lot more money, taken a lot more time, and would have been much more difficult to transport.

Step One:

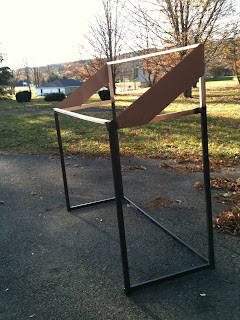
You need to decide how big you would like your awning to be. Find out the measurements for the width and length of your table and cut your pieces accordingly. We found we somehow overshot our measurements (Mistake #1. Once we got to the location that day we had to place the awning on a longer table. The extra space was helpful in the end, so it all worked out.

We purchased our lumber at Lowe's. We thought for cost we could get away with very inexpensive 1x2"s. The problem with this was the wood was not strong enough to easily screw or nail together. It kept splitting...and splitting...and splitting. (Mistake #2) Buy higher quality wood or at least wood with a larger diameter. We persevered, but it would have been so much easier. I used duck tape to further secure the joints. At the end of the day, we intended to only use this awning for one day and it only needed to be strong enough to sit on a table and hold fabric!

When measuring how tall your awning needs to be, remember that it will be sitting on a table. Therefore, don't think it looks great based on how it sits on the ground! (Mistake #3...don't estimate what you think the height of the table would be) Our awning ended up being pretty high! No matter what you decide. Ensure the back posts are higher than the front for a sloped look to your awning.  We also added the cardboard sides to support the fabric and create an edge once draped.

Spray paint does wonders and is quicker than painting with a brush! We used a flat brown. One can was enough. Remember you really only need to paint what WON'T be covered with fabric.

Step Two:


I bought a gazillion yards of fabric in two designs that I thought coordinated well. I had too much, but was glad to have extra for other design elements of the party (IE. DIY Flag banner around high chair).

We cut our fabric to size, and began using the staple gun to secure it. To get the sides perfect and to avoid any sewing...we made a corner like we would if wrapping a present then stapled. This worked perfectly!

Step Three:


We then added a strip of the coordinating fabric around the sides and front. We stapled to the front beam across the top and allowed the bottom to free flow.

Step Four:

We then stapled on a glitter ribbon trim to hide our seam and other staples. Because we only needed one staple every foot or two it wasn't really noticeable! You could also use a hot glue gun for this part instead.

Finishing the Look:

We found inexpensive hanging butterfly/flower garlands at a Hobby Lobby and hung them for added decor. You could always add additional fabrics for a closed in look if you desired! We found an old box and draped it with a paper table cloth to feature the cake and a few floral centerpieces. We also found inexpensive pink polka dot pop-up boxes and filled them with different crushed candies/treats to add to the ice cream!


We ended up loving the "one day" awning so much that we transformed it into a little princess playhouse! Using a basic slip knot I attached tulle to the sides and hung the garland along with it.  Now Maddy has a little house to play in.  After the holidays, I think I will add draping fabric to the front and jazz it up a little more!


Maddy's Sundae Shop: DIY 1st Birthday

When our first, and so far only, child Madison was about to turn the big O-N-E in November...I knew I needed the perfect theme to pull off her little celebration.  Unimpressed with the "prepackaged" party decor, I decided to embark on a DIY birthday adventure.  My quick, easy projects began to quickly add up! Before I knew it, I was swimming in a sea of birthday ideas. Over the next several posts I'll discuss each project in greater detail. Unfortunately, the thought of blogging about this of course came after I already completed the projects. In the future, I'll capture step-by-step images to help you!

Theme Inspiration: Sophie's Ice Cream Party

A search on google for "first birthday centerpieces" and I came across this web page for Sophie! (Click the link and you can see the design ideas for yourself...amazing!)

I instantly fell in love with the idea of an ice cream social themed party.  I am not a huge fan of cake myself, and thought an ice cream sundae station with awning would be a great alternative for desert.  I also fell in love with the idea of floral ice cream cone centerpieces! The rest of the ideas came as we developed the details.

Sundae Station

Floral Ice Cream Centerpieces and Sundae cups
Cake/Sundae Cup Inspiration: One Charming Party: Ice Cream Party

Every great party needs a cake...even if the guests will be eating ice cream instead! Also, what kind of first birthday doesn't have a cake to smash. Another Google search found One Charming Party and their super easy, adorable "melting" ice cream cake idea! I also then came across large disposable sundae cups. I didn't buy them from their linked shop. Instead I came across Shop Sweet Lulu, the most amazing little company to bring your event to the next level.

Original cake design featured by One Charming Party


My DIY version of the "Melting" Ice Cream Cone cake


Gift Table

DIY Party Hat


DIY Party Flags

The entertainment for Maddy's party was an incredibly talented balloon artist. It kept all the older kids occupied, even some adults! I thought I'd share the picture below to showcase one of the most popular balloons of the party. (...and of course because it's a funny picture of my husband! I guess this is his punishment for something!)


And of course! Who could forget the amazing Rachel Kline of Rachel Kline Photography for all of the amazing shots from Maddy's big day!!!! Word of advice...take all that money you saved by DIY! and hire a photographer for your first birthday bash! We never would have gotten these amazing images if we were trying to chase a one year old and host a party!!!